


Updated on: 2026-06-01
Aftermarket motorcycle fairings are a popular way to refresh your bike’s look and improve ride comfort. Many riders choose them to replace worn panels or to add a more modern, track-inspired style. The right fairings can also help manage airflow around the rider. In this guide, you will learn how to pick the correct fit, prep your bike, install safely, and maintain the finished result.
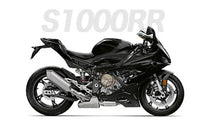
Why riders upgrade aftermarket motorcycle fairings
Aftermarket motorcycle fairings can change the feel of a ride. Even when you keep the same engine and frame, new bodywork can improve airflow control and update the bike’s overall appearance. For many riders, the main goal is protection and style at the same time. Fairings help guide wind around you, which can reduce fatigue on longer routes.
There is also a practical reason. Original panels can crack from stones, drops, or storage stress. Replacing them with compatible aftermarket motorcycle fairings can restore coverage and keep the bike looking clean. If you prefer a sharper silhouette, aftermarket options may offer more color styles and design choices than standard OEM parts.
Before you shop, focus on one key detail: fitment. A fairing must match your exact model year and mounting points. If the fit is off, you may end up with gaps, misalignment, and extra vibration. The goal is a tidy install that looks intentional and holds up over time.
Step-by-Step Guide
-
Confirm your bike’s exact model and year. Write down the model name, engine family, and year. If you have a variant like a special edition or a different headlight setup, note that too. Most fairing sets are designed around specific mounting locations, so small differences matter.
-
Check the fairing type you need. Decide whether you want full coverage, front-only, or a partial kit. Full sets often cover the windscreen area, side panels, and rear sections. Front kits typically include the nose and inner pieces. Choose based on your comfort goals and your budget.
-
Measure for compatibility. Compare your current panels with the kit’s mounting layout. Look at areas around the headstock, fork legs, tank edges, and seat cowl lines. If you cannot match the shape and screw locations, skip that option.
-
Inspect mounting points and fix issues first. Before installation, check that threads are clean and that brackets are straight. If any tabs are bent, correct them early. A fairing will only fit as well as the points it attaches to.
-
Gather the right tools. Plan for a clean workspace, a trim-friendly screwdriver or socket set, torque-appropriate hardware, and soft gloves for handling painted surfaces. Keep zip ties and a small container for screws so nothing gets lost.
-
Remove the old panels carefully. Start with the easiest sections. Label connectors and fasteners if your fairings cover wiring. Work slowly and avoid forcing plastic into place. If something resists, stop and confirm you removed every hidden clip.
-
Dry-fit the new fairings before final tightening. Place each section in position and check alignment lines around the headlight and windscreen. Dry-fitting helps you catch missing hardware or reversed brackets early.
-
Install inner pieces and brackets in the correct order. Many kits include inner panels, supports, or wind deflectors. Install these first so outer shells sit flush. Tighten fasteners gradually in a crisscross pattern to prevent warping.
-
Route cables and fasteners cleanly. Keep wire runs away from hot engine areas and moving parts. Use gentle cable ties and leave a small service loop where needed. A tidy route reduces rattles and long-term wear.
-
Final tighten and check movement. Once everything is aligned, tighten fasteners to your expected spec using the manufacturer’s guidance for your bike. Then turn the handlebars lock-to-lock and confirm nothing rubs. Sit on the bike and check for unusual wind noise.
-
Re-check alignment after a short ride. Vibration can settle the hardware. After a calm test ride, inspect fasteners and confirm panel gaps look even. Retighten if required.

Paint alignment checks with mock panel spacing
Choosing the right fit and style
Fit and style go together. When aftermarket motorcycle fairings match your mounting points, you get smoother lines and fewer wind leaks. If you want a more aggressive look, pick designs that echo your bike’s existing geometry. For example, sportbike fairings often emphasize sharp edges and a lower nose profile.
It also helps to think about the windscreen. If your kit uses the same screen mounting pattern as your original setup, installation becomes easier and the result looks more integrated. If your bike uses a different screen clamp or bracket style, double-check compatibility before you buy.
When you shop, look for fairings that are listed for your exact motorcycle family. If you ride a popular model, you may find many compatible options. For instance, riders often start their search with model-specific collections like CBR600RR fairings or Yamaha R6 fairings.
Prep work that prevents common problems
Most installation issues are preventable. Take time to clean the mounting surfaces and remove old residue from brackets. If a kit uses rubber grommets or spacer pads, do not skip them. Those small parts reduce vibration and stop plastic-on-metal contact.
If your bike has older fasteners, replace any hardware that looks stretched or corroded. Corrosion can reduce thread strength and cause loose panels later. Also, check the alignment of the headlight surround. A misaligned headlight area can force the fairing to sit crooked.
For color work, use gentle handling. Painted panels scratch easily if you slide them on concrete or drag them over cables. Wear clean gloves and protect the finish with a soft cloth when moving pieces.
Tips for better results with aftermarket fairings
- Pick a complete kit when you want a seamless look. A full set reduces mismatched edges between panels.
- Plan for ventilation and access. If you need easy access to the fuse box or radiator area, confirm the fairing design keeps service routes convenient.
- Use the right fastener length. Too short can loosen; too long can crack plastic or hit internal components.
- Inspect for gaps after every ride session at first. Early checks catch settling before it becomes a bigger issue.
- Choose materials that match your riding style. If you ride in hot weather, select panels that handle heat cycles without warping.
- Keep the install dry. Water trapped under a panel can cause corrosion on brackets and create stubborn mounting issues later.
- Match your bike’s front and side shapes. Even if the kit fits, inconsistent panel lines can increase wind noise.
- Store spare hardware safely. Place extra screws and clips in a labeled bag so you can fix future rattles.
Middle-to-later priorities after installation
Once your fairings are installed, the next phase is about stability and long-term care. You want the panels to stay aligned and look clean. A good habit is to do a quick visual inspection every few weeks, especially after wet rides. Look for any changes in panel gaps, new rubbing marks, or loose connectors.
Cleaning also matters. Use mild soap and a soft microfiber cloth. Avoid abrasive pads that can dull painted surfaces. If your kit has decals or graphics, wash gently around edges. Dry thoroughly because trapped moisture can collect dirt and reduce the shine over time.

Panel gap inspection with a checklist-style layout
Maintenance that keeps fairings looking sharp
Fairings collect grime along airflow edges. Wash those areas carefully, then rinse thoroughly. If you use any protectant, choose one designed for painted and clear-coated surfaces, and test it on a small area first. Avoid strong chemicals that can weaken clear coats.
Also, listen for rattles. Many noises come from cable contact, loose clips, or bracket stress. If you notice vibration, stop and check mounting points near the headlight and windscreen area. Then confirm cables are tied down and not touching the steering head or fork components.
Finally, keep your future upgrades in mind. If you plan to add a different windscreen height or a different handlebar setup, check how that affects fairing clearance. Small changes can create new wind paths and new points where plastic can touch.
Where to start when shopping
The fastest way to narrow choices is to shop by bike family. Model-specific collections reduce the guesswork and help you compare styles within a compatible set. If you ride a Honda sportbike, browse CBR1000RR fairings. If you ride a Suzuki sportbike, you can start with GSX-R 750 fairings. For general Yamaha sport options, use Yamaha R1 fairings.
When you compare listings, check how the kit is described. Look for details about included pieces, mounting style, and whether the kit is meant for street use or a specific bodywork setup. If the description is vague, search within the same collection for more detailed listings.
Safety notes and disclaimer
Installing motorcycle fairings can affect visibility, airflow, and how your bike handles at speed. If you are not confident with basic tools or bike disassembly, consider using a qualified mechanic. Always follow the instructions included with your parts and confirm fastener security before riding. This article is for general information only and does not replace professional advice.
Also, compatibility depends on your exact motorcycle configuration. Always verify year, model, and mounting points before purchasing.
FAQs
How do I know if aftermarket motorcycle fairings will fit my bike?
Start by matching your motorcycle year and model exactly. Then compare mounting point descriptions, check inner bracket layouts, and verify headlight and screen compatibility. A fitment-focused listing is usually more reliable than a generic universal description.
Should I install fairings myself or use a mechanic?
If you have basic tool experience and patience, you can often install fairings yourself by following the included instructions. If wiring, hidden clips, or complex bracket alignment is involved, a mechanic can reduce the chance of misalignment and rattles.
What causes wind noise after installing fairings?
Wind noise usually comes from small gaps, misaligned edges, or cables and panels touching in airflow. Re-check alignment, confirm fasteners are tight, and ensure the screen and headlight surround sit correctly in the kit’s mounting positions.
How do I maintain painted fairings to keep them looking new?
Wash with mild soap, use a soft microfiber cloth, and rinse thoroughly. Avoid abrasive cleaners and strong chemicals. Dry the panels well, and inspect fasteners periodically so the fairings keep their shape and spacing.
New Fairings, Not Used Fairings.